

Why Convention Deadlines Demand Perfect Files on First Try
When you’re prepping materials for a Las Vegas convention, one thing is crystal clear: there’s no room for file errors. You’re racing against the clock, your booth needs to look sharp, and the last thing you want is a phone call saying your file won’t print. We’ve handled thousands of rush orders, and we know exactly what goes wrong—and more importantly, how to stop it before it happens.
This guide walks you through our preflight process, our file standards, and the exact steps we use to get your prints done right, fast, and ready for your event.
Convention planning is a high-wire act. You’re coordinating booth design, shipping timelines, setup schedules, and event deadlines that don’t flex. The last buffer in that chain is printing, and there’s usually no second chance.
When you hand us a file the day before your event (or same day), we don’t have time to troubleshoot with you for hours. We need your file to be print-ready on arrival. A small issue—missing fonts, wrong color mode, low resolution on a large banner—can cascade into a missed deadline or compromised quality.
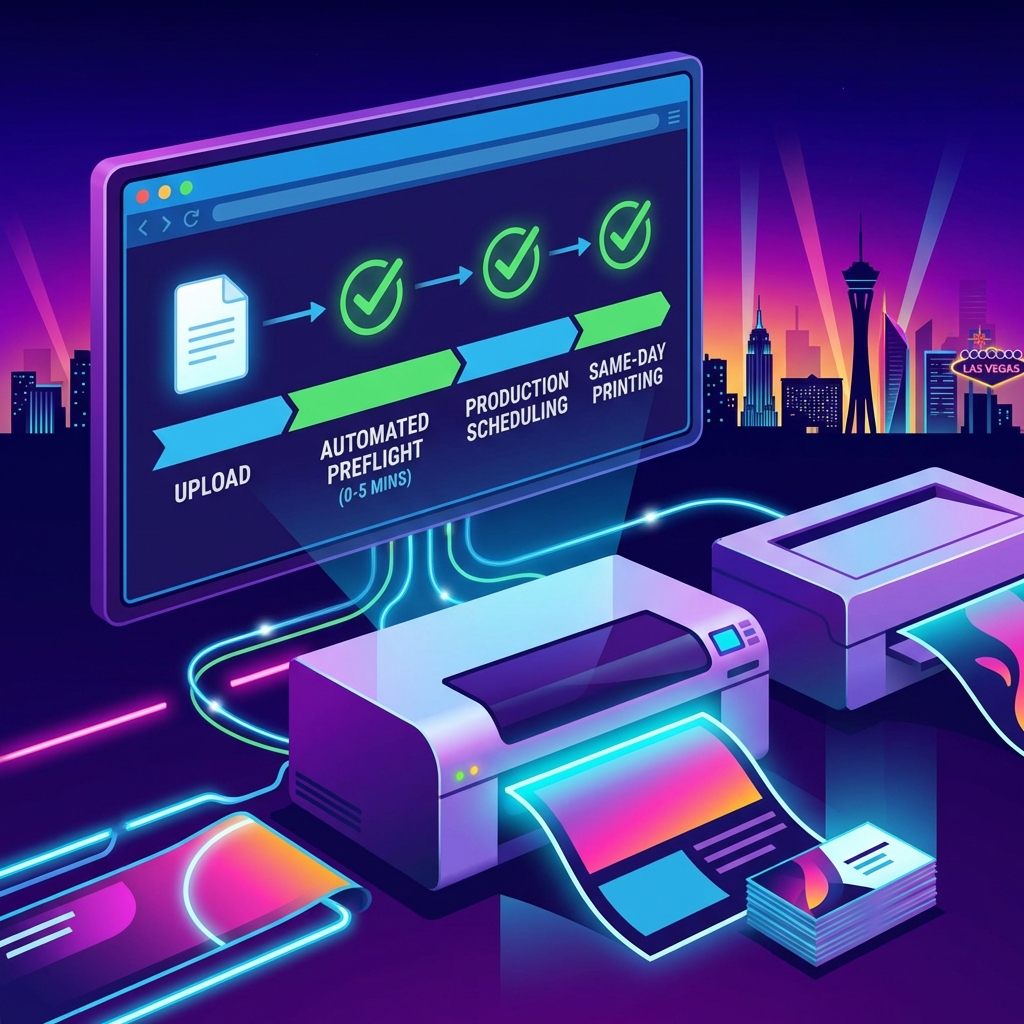
That’s why we built our preflight process to catch these issues automatically and immediately. Instead of passing back and forth emails with corrections, we use automated scanning to validate every file against our production standards before it even touches the press.
Here’s what perfect-on-arrival actually means for your timeline: You upload. We verify. We print. Your materials ship or are ready for pickup within hours, not days. No surprises. No delays.
The Real Cost of File Rejection and Printing Delays
Let’s be honest about what happens when a file gets rejected during production crunch time.
A banner file arrives with RGB color instead of CMYK. Our team catches it during preflight checks. Worst case, we have 30 minutes to contact you, you make the correction, reupload, and we start over. Best case, we have your permission to convert it ourselves. Either way, you’ve lost time you didn’t have.
But there’s a bigger issue: rejected files during convention week often mean your materials don’t arrive. Your booth goes up without signage. Your competitors’ displays look professional. Yours looks rushed. That’s not just a printing problem—that’s a brand problem.
We’ve seen marketing managers frantically calling us from the convention center floor because their file didn’t pass initial checks. It adds stress, eats into your setup window, and can actually cost you booth traffic if your materials miss their window.
Our automated preflight system eliminates this entirely. Every file is scanned before it enters production, so you get confirmation that you’re green to print within minutes of upload. No surprises at 11 PM the night before your event.
What to do next: When you’re planning your convention timeline, always budget your file submission for at least 2-3 hours before your desired print time. This gives our team time to run preflight, flag any issues, and get final approval—even with our automated system, it’s always faster than fixing problems mid-production.
Our Automated Preflight System Catches Issues Before Production
We invested in our preflight automation because manual file checking doesn’t work at our speed. When we’re doing same-day printing for 50 different events across Las Vegas, every file has to move fast without losing quality.
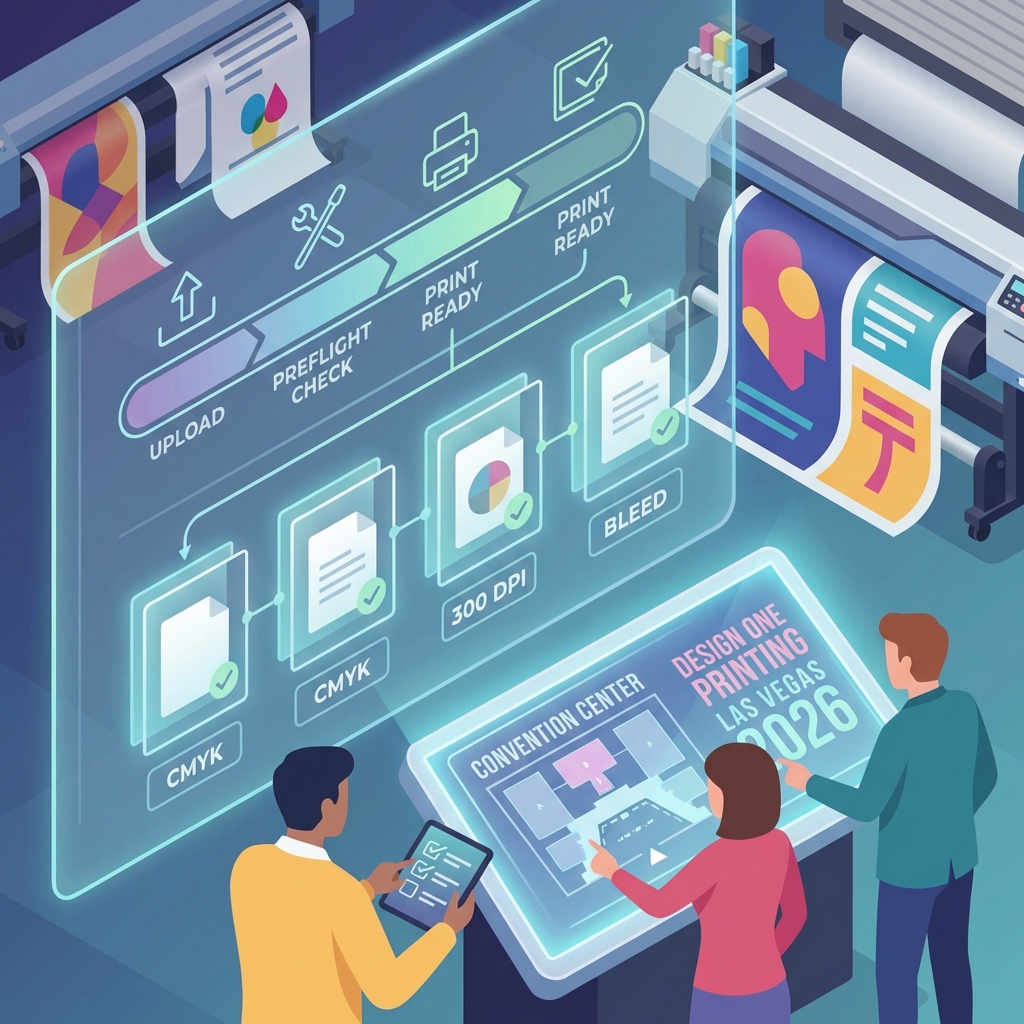
Our system runs the moment you upload. It automatically scans for:
- Missing or embedded fonts
- Color mode mismatches (RGB vs. CMYK)
- Resolution below our production minimums
- Bleed and margin violations
- Missing or incorrect color profiles
- File corruption or damage
The scan takes about 2-3 minutes. If everything checks out, you get instant approval and production starts immediately. If there’s an issue, you’re notified right away with a specific list of what needs fixing—not vague feedback, but exact corrections.
This isn’t us being picky. This is us being protective of your investment. A banner that prints with fuzzy edges or color shifts isn’t a technical failure—it’s a brand failure. Your display looks cheap. That’s the opposite of what you’re paying for.
Our automated approach means we catch 99% of file issues before they become production problems. You get faster turnaround and guaranteed quality because the hard checks happen upfront, not after printing starts.
What Makes Our File Acceptance Policy Different
Most print shops have file requirements that feel like a list of rules. We have standards that exist for one reason: to make sure your prints look incredible.
Here’s what’s different about how we approach file acceptance:
We don’t reject files for minor issues if we can fix them. If your file is 297 dpi instead of 300 dpi, we’re not going to make you resubmit. If your bleed is slightly off but your design is solid, we handle it. We’re here to solve, not to create obstacles.
We’re transparent about what matters. Resolution, color mode, font embedding, and file format matter because they directly affect print quality. File naming conventions don’t. We care about the output, not the paperwork.
We have a real human backup. If your file flags something our automated system can’t automatically resolve, it goes to our production team. They review it, evaluate if it’s printable, and either approve it or contact you with specific fixes. No mysterious rejections. No “we can’t print that”—just “here’s what we need from you.”
We built this approach because we remember what it’s like to be on deadline. You don’t need rules. You need speed and clarity. Our file acceptance policy is designed around that reality.
Step-by-Step Guide to Our Simplified Upload Process

Getting your file to us should take under 60 seconds. Here’s exactly how it works:
Step 1: Go to our upload portal Navigate to our file upload page on our website. No account setup required, no login walls.
Step 2: Select your product type Is this a banner? Business cards? Brochures? Select the category and our system automatically applies the correct specs and standards for that product.
Step 3: Upload your file Drag and drop your file into the upload area. We accept PDF, AI, PSD, EPS, and high-res JPG formats (more on this in a later section). File uploads typically complete in under 30 seconds depending on file size.
Step 4: Add your contact information and rush details Enter your name, email, phone, and desired delivery or pickup date. Be specific about your deadline—same-day, next-day, or scheduled date.
Step 5: Review the preflight summary Within 2-3 minutes, you’ll see the automated preflight results. Green means we’re printing. Yellow or red means we need adjustments or clarification.
Step 6: Approve for production Once everything checks out, click approve. Your job enters the production queue and we send you a confirmation with estimated completion time.
From upload to approval typically takes under 5 minutes. No back-and-forth emails unless we flag something that needs fixing. No waiting by the phone.
Actionable step: Save our upload page as a bookmark. When you’re in convention-planning mode and need same-day printing, you can get materials submitted in under two minutes.
Our Same-Day Preflight Checklist for Common File Mistakes
We see the same issues repeatedly, and they’re almost always fixable. Use this checklist before you upload to catch problems yourself:
Resolution Check Business cards, flyers, and brochures: 300 dpi minimum. Large format banners and signage: 150 dpi minimum if viewing distance is 10+ feet (yes, smaller resolution works for large prints viewed from a distance). Your file spec should list the required resolution for your product—check it before uploading.
Color Mode If your file is for print, it must be CMYK. RGB is monitor color and won’t print accurately. If you’re unsure, check your file properties or open it in your design software and look at the color mode. Most files get rejected because they’re accidentally in RGB.
Fonts and Text All fonts must be embedded or outlined. This means the font file travels with your design so we can render it exactly as you intended. If fonts aren’t embedded and we don’t have them, text can shift or change. Always check: are my fonts embedded? (In Adobe programs: File > Package or check the links panel.)
Bleed and Margins For products that get cut (business cards, postcards, brochures), we need bleed. That’s an extra 0.125 inches of color that extends beyond the cut line. This prevents white edges if the guillotine shifts slightly. Your template will include guides for this—don’t ignore them.
Color Profiles Use a standard CMYK profile like US Web Coated or ISO Coated. If your file has an unusual or mismatched color profile, colors can shift unexpectedly. Keep it standard.
File Names and Format Use clear file names (banner_vegas_2026_final.pdf, not final2_v3_actualfinal.pdf). Save as PDF for easiest processing. PDF keeps everything embedded and locked, which reduces the chance of last-minute surprises.
Image Quality Linked images must be embedded. If your design uses images that are linked but not embedded, and we don’t have access to those image files, your design breaks. Always embed.
Run through this checklist before upload, and you’ll eliminate 95% of file rejection issues.
How Our Workflow Gets Your Prints Ready in Hours, Not Days
Once your file passes preflight, here’s what happens behind the scenes—and why we can deliver same-day printing.
Immediate Production Scheduling (0-5 minutes after approval) Our production team gets a notification the moment you approve. They review the job, confirm materials availability, and add it to the press queue. For same-day orders, we prioritize by arrival time and deadline. If your event needs materials by 5 PM and the file approves at 10 AM, we slot you into the morning run.
Parallel Workflow While the print is running, our finishing team preps materials. If you need binding, trimming, or special finishing, that happens in sequence. We don’t wait for one step to finish before starting the next.
Quality Check (During and After) We run sample checks during production and 100% inspect the final output. For convention materials especially, your booth display is a reflection of your brand. We treat every job like it’s going on the Strip because, honestly, many of them are.
Finishing and Packaging Once printing is done, we fold, cut, bind, or package based on your specs. If you’re picking up, we have it ready at our counter. If we’re shipping, we box it and hand it to the carrier the same day.
Delivery Confirmation You get notified when your materials are ready for pickup or have shipped. For convention orders, we can coordinate same-day delivery to your hotel or convention center. For larger jobs heading to multiple locations, we can split shipments.
The whole process from approved file to finished product typically takes 4-8 hours for same-day orders. The speed works because every step is optimized, and we don’t hold jobs waiting for perfect batching. Your deadline is our deadline.
File Formats We Accept and Why They Matter
Not all file formats are created equal when it comes to printing. Here’s what we take and why:
PDF (Preferred) PDFs lock everything in place: fonts, images, colors, layers. It’s like taking a photo of your design and printing from that. Zero variables. PDFs also compress file size, so uploads are fast. If you’re submitting one file format, make it PDF.
Adobe Illustrator (.AI) Native design files are fine if they’re clean and all assets are embedded. AI files are vector-based, which means they scale infinitely without losing quality. For logos, banners, and clean graphic work, AI is ideal. Just make sure all fonts are outlined and all images are embedded.
Photoshop (.PSD) We accept PSD files, but they need to be flattened (all layers merged) and 300 dpi. Layered files can be unpredictable in production because different software reads layers differently. If you’re submitting PSD, flatten it first.
EPS (Encapsulated PostScript) Old-school but reliable. EPS is vector-based and we can definitely print from it. Less common now, but if that’s what your designer handed you, we’re good with it.
JPG (High-Res Only) We accept JPG files only if they’re high-quality exports at 300 dpi. JPG is compressed, so quality degrades with compression. Never edit a JPG repeatedly—that compounds compression loss. Use JPG for finished exports only, not source files.
What We Don’t Accept Avoid Word documents, PowerPoint files, web graphics, or low-res images. They’re not designed for print and typically won’t meet our quality standards. If that’s all you have, reach out—we might be able to work with you, but upfront, these formats usually need to be redesigned.
Pro tip: When in doubt, PDF is always your safest bet. It’s the most predictable format and eliminates most format-related issues.
Color Profiles and Resolution Standards for Perfect Results
This is where technical specs meet real-world results. Get these right and your prints look sharp and true. Miss them and colors shift or details disappear.
Resolution Standards
We require 300 dpi for most print products (business cards, flyers, brochures, postcards). This is the printing industry standard because it’s the threshold where the human eye stops seeing individual dots. Below 300 dpi, prints can look pixelated or soft.
For large format printing like banners, signage, and displays, the math is different. A banner hanging 10 feet away doesn’t need the same pixel density as a business card you hold in your hand. We accept 150 dpi for most large format work. Anything closer than 5-6 feet viewing distance should be 200+ dpi.
The rule of thumb: resolution divided by viewing distance. A banner viewed from 15 feet away needs 100-150 dpi. A tabletop display viewed from 2 feet needs 300 dpi. Your job specs will list the requirement for your specific product.
Color Mode: CMYK Is Non-Negotiable
Your monitor displays color in RGB (red, green, blue light). Printing uses CMYK (cyan, magenta, yellow, black ink). These are completely different color systems, and RGB colors often look dull or shift when converted to CMYK.
Before you upload, convert your file to CMYK in your design software. If you skip this step and we have to convert, some colors might shift slightly—not because we did something wrong, but because the color spaces are fundamentally different.
Why does this matter? A bright electric blue in RGB might become a darker, more muted blue in CMYK. If your brand color is that electric blue, you want us to reproduce it as closely as possible. Starting in CMYK lets your designer make adjustments upfront so the final print matches your brand.
Color Profiles
Use a standard CMYK profile like US Web Coated SWOP 2 or ISO Coated v2. These are industry-standard profiles that most print shops use, so colors stay consistent. Unusual or proprietary color profiles can cause shifts or compatibility issues.
Don’t overthink this: if your designer gave you a file, it’s probably already profiled correctly. Just verify it’s one of the standard profiles before uploading.
Spot Color vs. Full Color
Some designs use spot colors (specific ink colors mixed to exact specifications, used for logos). Spot colors are more expensive but guarantee perfect color matching across all prints. Full color (CMYK) uses process colors and is more cost-effective for photo-heavy designs. Know which one your design uses and budget accordingly.
Get these fundamentals right and your prints come out looking exactly like you envisioned.
Special Requirements for Convention Signage and Large Format Prints
Convention materials have specific challenges that standard business card or brochure printing doesn’t face. Your booth signage needs to pop on a crowded show floor, handle the wear and tear of setup, and often needs to work at multiple locations across Vegas.
Same-day wide format printing for convention banners and displays is our specialty. Here’s what you need to know:
File Size Matters
A banner that’s 10 feet wide needs a much larger file than a standard poster. We’ll give you the exact pixel dimensions, but understand that a 10×20 foot banner file can be 800 MB+. Make sure your upload connection is solid and you have time for the transfer. We support uploads up to 2 GB, and our system will notify you if a file is too large.
Bleed for Large Format
Just like smaller prints, large format needs bleed. Standard bleed is 0.25 inches on all sides for banners. If your design has color or graphics that touch the edge, extend them past the trim line so there’s no white showing if the cut isn’t perfect.
Material Selection and File Prep
Are you printing on vinyl? Canvas? Fabric? Rigid material? Different substrates require slightly different file preparation. Matte finishes can handle slightly lower resolution than glossy. Fabric prints sometimes need slightly higher contrast. We’ll guide you on this based on your material choice, but mention it during upload so we can apply the right specs.
Setup and Installation Files
For multi-part displays or installations, we often need multiple files. Send us detailed specs on how pieces fit together. If a display breaks into four panels, label each file clearly (panel_A_top_left.pdf, etc.) and include assembly notes. This prevents confusion during production and ensures pieces fit together perfectly on the show floor.
Mounting and Hardware
Tell us how you’re hanging or mounting the display. Grommets? Velcro strips? Magnetic backing? We can add these during finishing, but we need to know upfront so we size files correctly and apply finishes to the right spots.
Convention signage is high-visibility work. Get the file specs right and you’ve got a display that looks professional and stands out on the show floor.
Why Marketing Managers and Event Planners Trust Our Process
We work with Las Vegas event professionals constantly—marketing managers planning convention displays, event planners coordinating multi-location branding, trade show coordinators handling signage for dozens of booths. They trust our process because it’s built around the reality of event deadlines.
Reliability Under Pressure
When you submit files at 8 AM for a 5 PM deadline, there’s no room for excuses. Our automated preflight system doesn’t have bad days or get overwhelmed. It runs the same check every time with the same standards. You get consistent, predictable results.
Transparency About What’s Possible
We tell you upfront what we can and can’t do. If you send a file with missing fonts at 4 PM and need it tomorrow, we’ll tell you exactly whether we can fix it or if you need to resubmit. No false promises. No surprises.
Speed Without Cutting Corners
We’re not fast because we’re sloppy. We’re fast because we’ve eliminated waste and bureaucracy from our process. Every step is optimized. Your file goes straight to production. No sitting in a queue. No waiting for approvals. Just prints.
Local Partnership
We’re minutes from the Las Vegas Strip and the convention centers. If something needs to move fast, we can hand-deliver. If you need to come in and see a sample before full production, we’re accessible. For event professionals working across Vegas, being local matters.
Event planners and marketing managers have small teams and big deadlines. They don’t have time for print shops that require three rounds of emails to clarify specs. We give them speed, clarity, and guaranteed quality so they can focus on actually running their events.
Get Your Convention Materials Right the First Time
Getting your files right on the first submission is the fastest path to perfect prints. Use our preflight checklist, follow the format and color specifications we’ve outlined, and submit with enough time for us to verify (even with automation, human review takes a few minutes for flagged items).
Here’s your action plan:
- Before design starts: Download our file specs for your product from our website. Send them to your designer. Make sure they know resolution, color mode, and bleed requirements upfront.
- Before upload: Run through our preflight checklist. Verify resolution, CMYK color mode, embedded fonts, bleed, and file format.
- During upload: Be specific about your deadline and material preferences. The more detail you give us, the fewer clarifying questions we need to ask.
- After approval: Watch for our confirmation email. It’ll include your estimated completion time. For same-day printing, this is usually 4-8 hours.
- Ready for pickup or shipment: Confirm your delivery method (pickup at our location or shipment) and we’ll have your materials ready when promised.
We handle convention printing every single week. We’ve seen every file issue that exists and built our process to prevent them. You’re not the first person to submit files in a rush, and our system is built for exactly that scenario.
Questions about your specific project? Contact us and we’ll walk you through specs. Have a file ready to go? Upload it now and we’ll get you confirmed within 5 minutes.
Your convention is counting on you to show up prepared. We’re counting on ourselves to get your materials done right. Let’s make your booth look sharp.
Contact us today at designoneprinting.com to see how we can help on your next project.


